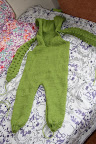
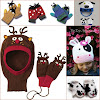
Модель изначально называлась "Frog Suit with Hood" и была опубликована в книге "Wacky Baby Knits" by Alison Jenkins
Описание на английском языке:
This all-in one outfit will keep baby snug as a bug—or amphibian—in a rug from head to toe, and the hood even has soft knitted frog eyes. Rows of knitted bobbles along the sleeves and hood add an irresistible tactile texture to the knit, but because the yarn used is very soft the bobbles won’t feel lumpy against your baby’s skin.
You Will Need:
Pair of size 3 (3.25 mm) needles
Pair of size 6 (4 mm) needles
Size 3 (3.25 mm) circular needle
5 (6 : 7) 2 oz (50 g) balls light worsted
knitting yarn in color A (green)
Oddment of light worsted knitting yarn in color B (white)
Oddment of light worsted knitting yarn in color C (black)
Tape measure
Stitch holders
Bodkin
17 small green buttons
Small amount of soft toy filling, approximately ½ oz (15 g)
To Fit Sizes:
0–3 months: chest 16 in (41 cm)
3–6 months: chest 18 in (46 cm)
6–12 months: chest 20 in (51cm)
Gauge:
22 stitches and 30 rows to 4 in (10 cm), measured over stockinette stitch, using size 6 (4 mm) needles
Special Abbreviation:
mb—make bobble.
Work to bobble position; purl into the next stitch, then knit into the same stitch. Repeat once more, then purl once. You will have made five extra stitches.
Use the tip of the left-hand needle to pass the first four extra stitches over the last to form the looped bobble. Work to next bobble position, and repeat.
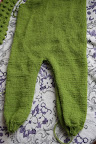
Back Legs (make 2 alike):
Using size 3 (3.25 mm) needles and col A, cast on 16 (16: 18) sts.
Work in k1, p1 rib for 1¼ in (3 cm), ending with a rs row.
Increase row with ws facing: rib 4 (2: 3), then *m1, rib 1 st; rep from * to last 3 (2: 2) sts, m1, then rib to end. (26 [29: 32] sts.)
Change to size 6 (4 mm) needles, and cont in st st until work measures 8 (8¾: 9½) in [20 (22: 24) cm] from cast-on edge, ending with a ws row.
Transfer sts to a stitch holder.
Body
Join legs to form body: work across sts from one leg, then work sts held on stitch holder from the other leg.
Cont in st st on these 52 (58: 64) sts until work measures 8½ (9: 9½) in [22 (23: 24) cm] from the crotch join, ending with a ws row.
Raglan Decrease:
Bind off 3 sts at beg of next 2 (2: 2) rows **, then dec 1 st at both ends of next and every alt row until there are 18 (20: 22) sts, ending with a ws row.
Leave sts on a stitch holder.
Front:
Work as back to **.
Divide for Front Opening:
With rs facing, begin raglan shaping as follows: dec 1 st, knit 18 (21: 24) sts, turn, and place the rem sts on a stitch holder. Work 1 row in st st.
Cont dec 1 st at same end of next and every alt row until there are 11 (12: 15) sts.
Work 1 row in st st.
Neckline Shaping:
With rs facing, dec 1 st, work to last 2 sts, dec 1 st.
Dec 1 st at neck edge of next 3 (4: 5) rows, while continuing the raglan shaping at the armhole edge. There are now 5 (4: 6) sts.
Dec 1 st at armhole edge only on rs rows until 2 sts rem.
Place rem 2 sts on a stitch holder.
Slip the sts for the right front from the stitch holder onto your needle, and rejoin col A.
Bind off the first 6 sts, then cont following pattern instructions to make the right front section, remembering to reverse the raglan and neckline shapings.
Place rem 2 sts on a stitch holder.
Sleeve (make 2 alike):
Using size 3 (3.25 mm) needles and col A, cast on 26 (29: 31) sts.
Work in k1, p1 rib for 1¼ in (3 cm) ending with a rs row.
Increase Row with ws Facing:
First size: rib 3, then *m1, rib 3; rep from * to last 2 sts, inc 1 st, then rib to end. (34 sts.)
Second and third sizes: rib (3: 4), *inc 1 st, rib 3; rep from * to last (2: 3) sts, inc 1 st, rib to end.
There are now 34 (38: 40) sts.
Change to size 6 (4 mm) needles, and begin patt as follows:
Cont in st st for 4 rows.
Next row (bobble row): with rs facing, work 4 (6: 7) sts *mb, work 4 sts; rep from * to last 0 (2: 3) sts, k0 (2: 3).
Work 5 rows, then work bobble row, keeping bobbles in same position vertically.
Cont in patt.
Inc 1 st at both ends of 2nd (2nd: 2nd) row, then at both ends of every foll 6th (10th: 10th) row
until you have 40 (44: 48) sts. Work 5 (7: 9) rows.
Raglan Decrease:
Bind off 3 sts at beg of next 2 rows, then dec 1 st at both ends of next and every alt row until 6 sts remain.
Leave rem 6 sts on stitch holder.
Hood:
With rs facing, using size 6 (4 mm) needles and col A, pick up and knit 10 (12: 14) sts up right front neck, k across sts on front and first sleeve stitch holders, across back neck work *k1, m1; rep from * to last st, k1, k across sts on second sleeve and front stitch holders, then pick up and k10 (12: 14) sts down left front neck.
(71 [79: 87] sts.)
Purl 1 row.
Cont in st st until hood measures 7 (7½:  in [18 (19: 20) cm], ending with a ws row, then bind off 22 (26: 30) sts at beg of next 2 rows.
With rs facing, cont on rem sts and patt as follows:
Cont in st st for 4 rows.
Next row: with rs facing, work 3 (3: 4) sts *mb, work 4 sts ; rep from * to last 4 (4: 4) sts, mb, work to end.
Work 5 rows, then work bobble row, keeping bobbles in same position vertically.
Cont in patt for a further 4½ (5¼: 6) in [11 (13:15) cm], ending with a ws row.
Bind off all sts, and fasten off securely.
Using a bodkin and col A, join hood seams.
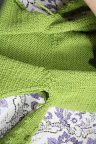
Button Band and Buttonhole Band for Front Opening and Hood:
Using a size 3 (3.25 mm) circular needle, pick up and knit 17 (19: 19) sts along right front opening to neck, then 42 (46: 50) sts along right side ofhood to seam, 27 (27: 27) sts across hood center front to other seam, 42 (46: 50) sts down left side of hood, and 17 (19: 19) sts along left front opening.
Work in k1, p1 rib for 3 rows.
Buttonhole row: Rib 3 sts, *yrn, k2tog, rib 4; rep from * another 2 times, then rib to end.
Rib for 3 more rows, then bind off all sts in rib, and fasten off securely.
Button Band and Buttonhole Band for Leg Opening
Button Band:
With rs facing, using size 3 (3.25 mm) needles and col A, pick up and knit 45 (51: 57) sts evenly along inside leg edge of back to crotch, beg at the ankle rib of the left leg, then pick up and knit 46 (52: 58) sts from crotch to the edge of the right ankle rib. Work in k1, p1 rib for 7 rows, then bind off all sts in rib, and fasten off securely.
Button Hole Band:
With rs facing, using size 3 (3.25 mm) needles and col A, pick up and knit 45 (51: 57) sts evenly along inside leg edge of front to crotch, beg at the ankle rib of the right leg., then pick up and knit 46 (52: 58) sts from crotch down to the edge of the left ankle rib. Work in rib for 3 rows.
Buttonhole row: Rib 4, *yrn, k2tog, rib 5 (6: 7); rep from * to last 4 sts, yrn, k2tog, rib to end. Rib 3 more rows, then bind off all sts in rib, and fasten off securely.
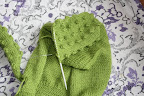
Eyes and Eyelids (make 2 of each):
Using size 3 (3.25 mm) needles and col A for eyelids (col B for eyes), cast on 18 (24: 30) sts.
Purl 1 row, then cont in st st for 6 (10: 12) rows.
Next row: *k1, k2tog; rep from * to end.
Break off yarn, then draw it through the rem sts, pull together tightly, and fasten off securely.
Nostrils (make 2):
Using size 3 (3.25 mm) needles and col A, cast on 15 (18: 21) sts. Purl 1 row, then cont in st st for 6 (8: 10) rows.
Next row: *k1, k2tog; rep from * to end.
Break off yarn, then draw it through rem sts, pull together tightly, and fasten off securely.
Sewing Together:
Join raglan, sleeve and side seams. Weave in all loose ends neatly on the reverse.
Overlap the bands and sew the lower edges to the bound-off edge at the center front opening.
Sew buttons onto lower left front side of button band to correspond with buttonholes.
Sewing Together Eyes and Eyelids:
Join eye seam, and stuff each with a small amount of toy filling. Sew the cast-on edges to the hood at the end of the seam near the crown. Take an eyelid, and wrap it around the back part of the eye, so that the cast-on edge forms the lid around the eye. Sew the other edge to the hood around the base of the eye.
Sewing Together Nostrils:
The cast-on edge represents the opening of each nostril; sew the other edge to the hood close to the seams at the front.
Weave in all loose ends neatly on the reverse. Finally, use a small amount of yarn in col C to make large stitches at the front of each eyeball to represent pupils.
 на фотохостинг →
 на фотохостинг →
 на фотохостинг →